As design trends continue to evolve, so does the need for robust design tools. Figma, one of the most popular design software options, is constantly updating and improving its features to stay ahead of the game. In this article, we'll take a look at some of the most exciting Little Big Updates that Figma has in store for 2023. Whether you're a seasoned Figma user or just starting out, these updates are sure to help streamline your design process and elevate your work to the next level.
Alpha, Vector and Luminance Masks
Figma's masking features have always been a powerful tool for designers, and now they've gotten even better! With support for alpha, vector, and now luminance masks, the possibilities are endless.
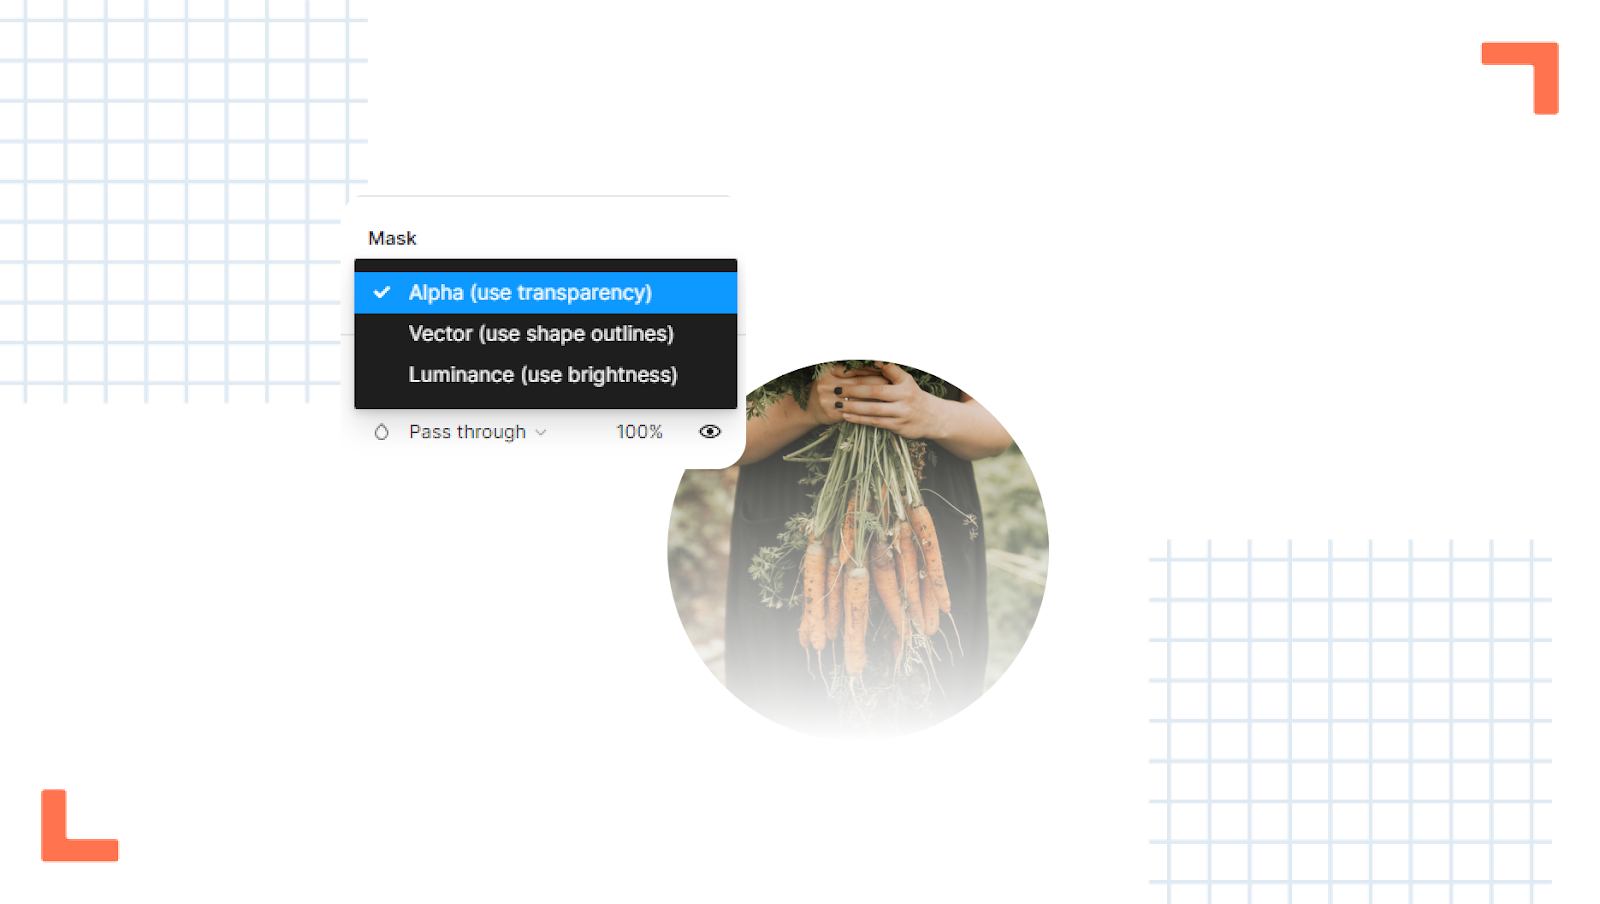
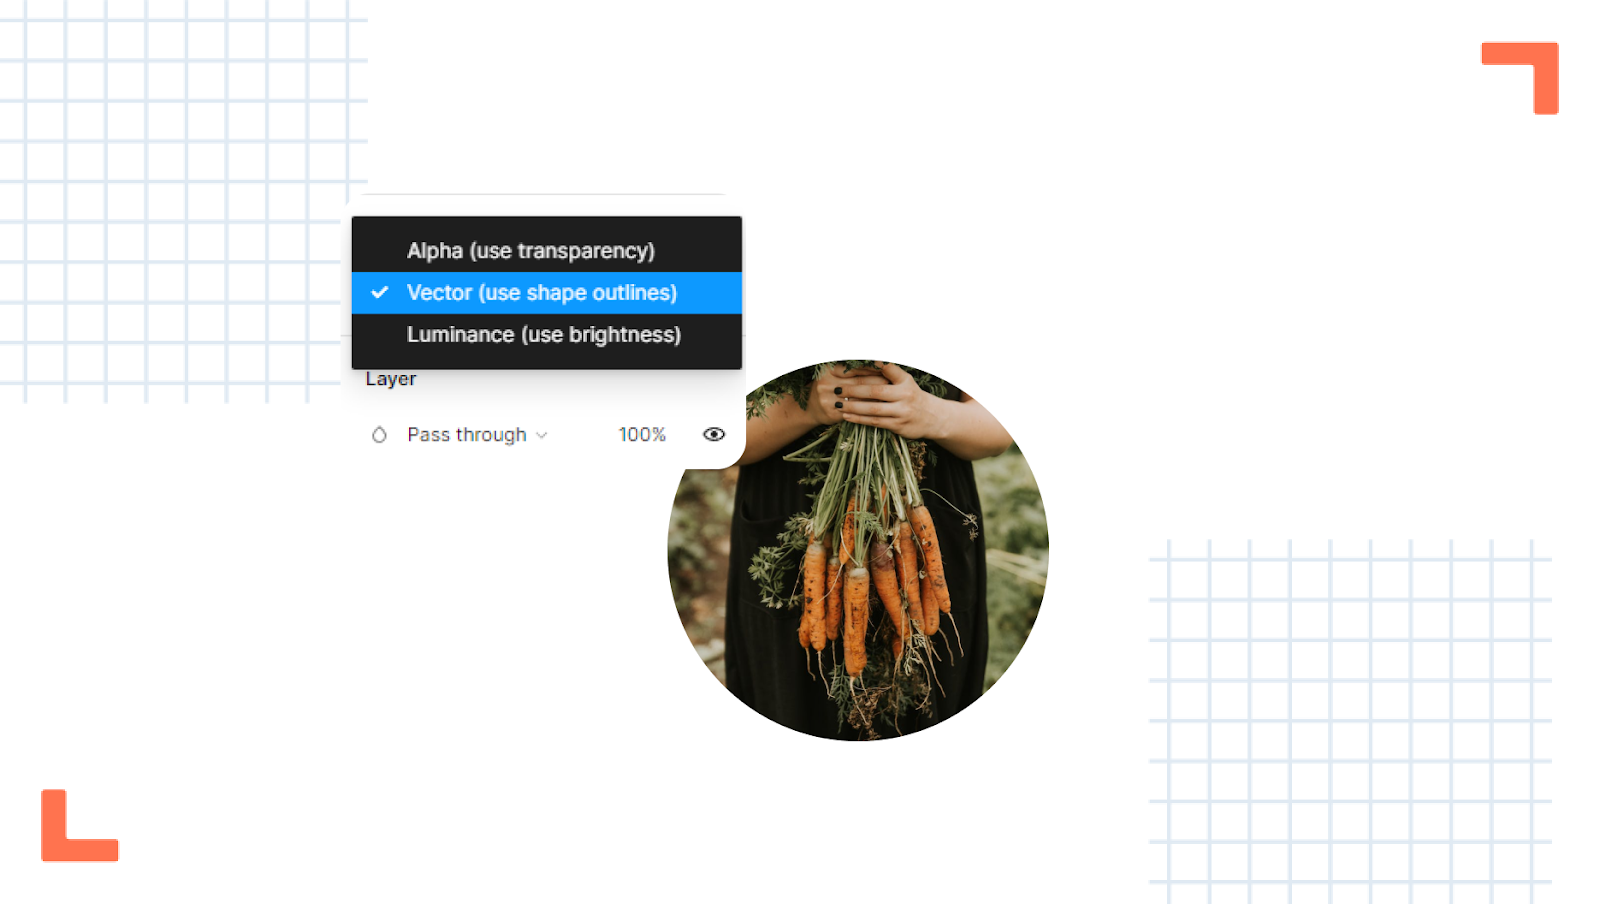
Alpha masks are applied based on the opacity of the mask, with a higher opacity revealing more. Vector masks, on the other hand, ignore the translucency of a mask's fill or stroke, using only the shape outline as a mask. And the new luminance masks allow you to use brightness to determine a mask, opening up even more creative opportunities.
Whether you're using layer blur effects to replicate feathering, applying drop shadows to create depth, or adding fills, strokes, and gradients with varying opacity, Figma's masking features give you the flexibility to create truly unique designs. So why not experiment with these powerful tools and see what amazing effects you can achieve? Let’s try them out!
To create a mask, select the layer you want to use as a mask and the layer you want to mask. Then, click on the "Mask" button in the top toolbar or right sidebar. Alternatively, you can right-click on the layer you want to mask and select "Mask with Shape" or "Mask with Text."
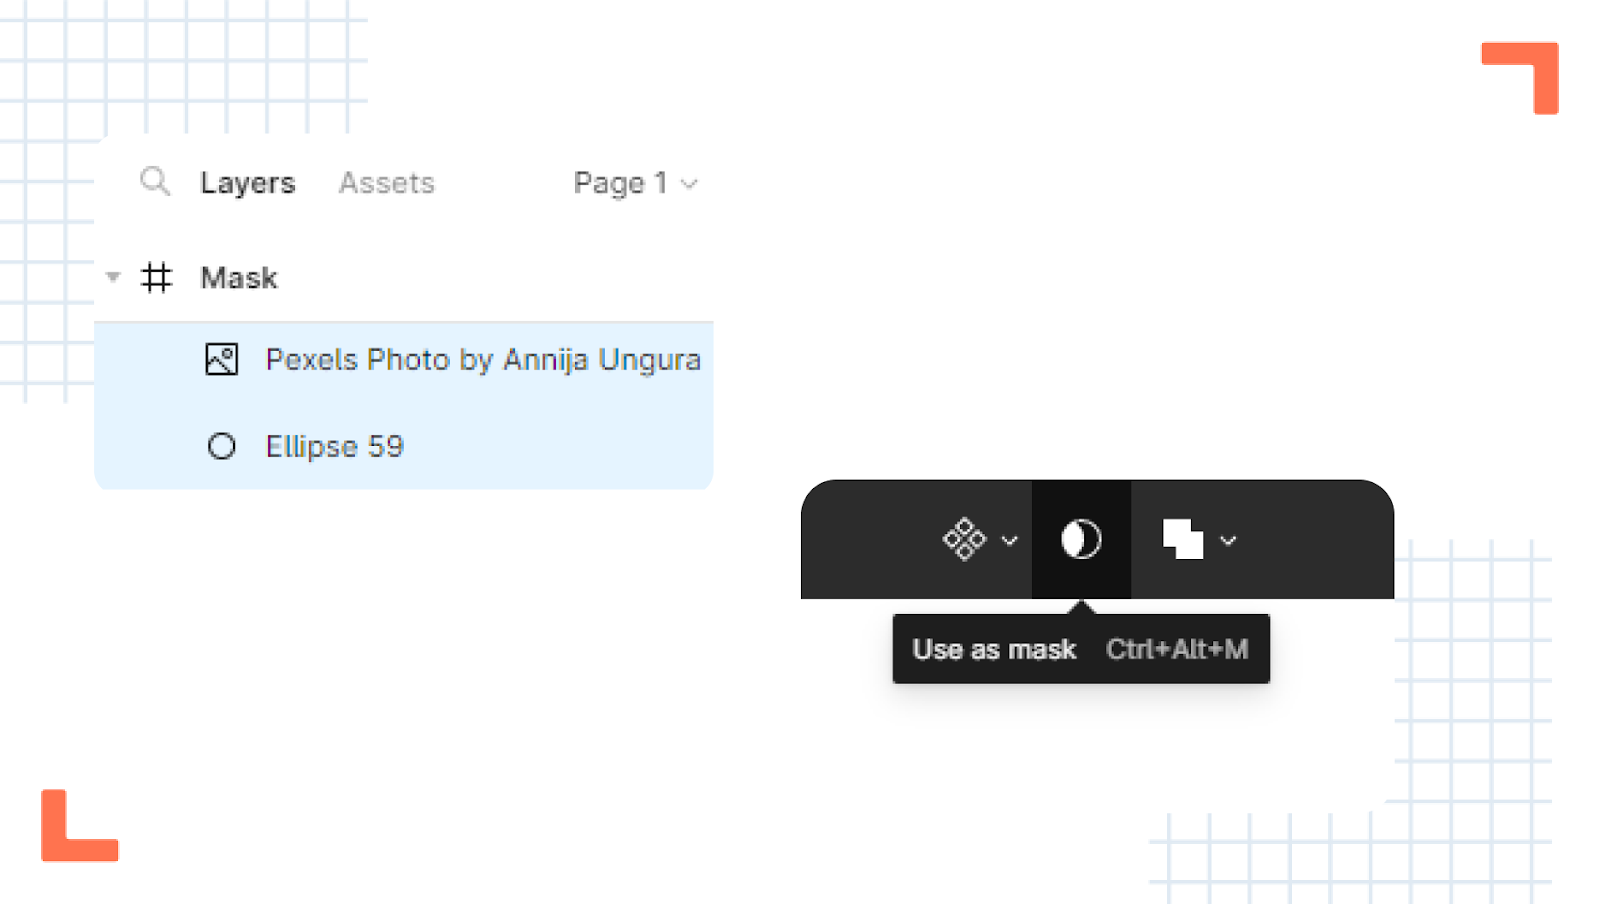
Alpha
When working with alpha masks, the level of opacity applied to the mask determines how much of the content is revealed. An opacity of 0% means that nothing is visible, while an opacity of 100% means that everything is visible.
To demonstrate this, take a look at the image below, where we've added a mask with a gradient that goes from 0% opacity to 100% opacity. As you can see, the image is gradually revealed as the opacity of the mask increases.

Vector Masks
Vector masks are a powerful tool in Figma that allow designers to use shape outlines as masks, regardless of the translucency or opacity value of the mask's fill or stroke. When working with vector masks, any area with an opacity value of more than zero percent is ignored and the outlines of the shape are used as the mask. This means that the entire mask assumes 100% opacity, even if some areas are translucent.
To see this in action, we can use the same gradient-filled vector from our previous example, but this time select "Vector mask". The outline of the entire image will be used as the mask, regardless of the transparency of the gradient fill. Vector masks are a great way to create complex shapes and effects in your designs, so don't be afraid to experiment with them!
Luminance Masks
In addition to alpha and vector masks, Figma's powerful new masking features also include luminance masks. With luminance masks, the brightness of an area determines the degree of opacity for the layers being masked. The brighter the area, the more that is revealed and the higher the opacity of the masked layers. Conversely, darker areas reveal less, with black fills rendering the masked layers at zero percent opacity. Luminance masks offer yet another level of control for designers to create stunning and intricate designs with ease.

Leading trim
Using Figma's leading and vertical trim features not only helps to tidy up your text, but it can also have practical benefits for handoff. By using these features to achieve precise measurements for text spacing and alignment, you can ensure that your designs are accurately represented in code. This can be especially helpful when working with CSS margin and padding values, which often require precise pixel measurements to achieve the desired layout.
By using Figma's trim features to achieve these measurements, you can make it easier for developers to understand and implement your designs. So if you want to streamline your design workflow and ensure accurate handoff, be sure to give Figma's leading and vertical trim features a try!

Sticky scroll
Figma's new sticky scroll and overflow behavior features are a game-changer for designers who want to create more dynamic and interactive prototypes.
With the ability to define scroll positions for individual layers within a frame, you can create sticky scrolling effects that keep important information at the top of a page. This is especially useful when working with longer pages or when you want to ensure that certain elements remain visible at all times. Figma supports three different scroll position options: Scroll with parent, Fixed, and Sticky.
Sticky scrolling, in particular, is a powerful new feature that allows you to stick an element in place after a certain scroll position has been reached. This can be a great way to draw attention to important information or create more engaging interactions.
While Figma's new scroll and overflow behavior features have some limitations and room for improvement, they still represent a significant step forward for designers looking to create more dynamic and immersive prototypes. Some users have reported performance issues when working with auto-layout, and while the sticky scrolling feature is a useful addition, it could benefit from even more options for controlling element positioning during scrolling.
Despite these drawbacks, however, Figma's scroll and overflow behavior features provide a valuable tool for designers who want to create engaging user experiences. With the ability to define scroll positions for individual layers and create sticky scrolling effects, designers can now create prototypes that are even more realistic and dynamic, ultimately helping to bring their designs to life.
If you’d like to learn more, read our top quality guide on Figma prototyping.
Exposed nested instances
Figma's latest update has brought exciting news for designers looking to have more control over their components. The new feature allows users to expose nested instances, set preferred values for instance swaps, and simplify all instances within component properties. With this added functionality, design system users can easily discover nested instances and their component properties without deep-selecting layers to find them.
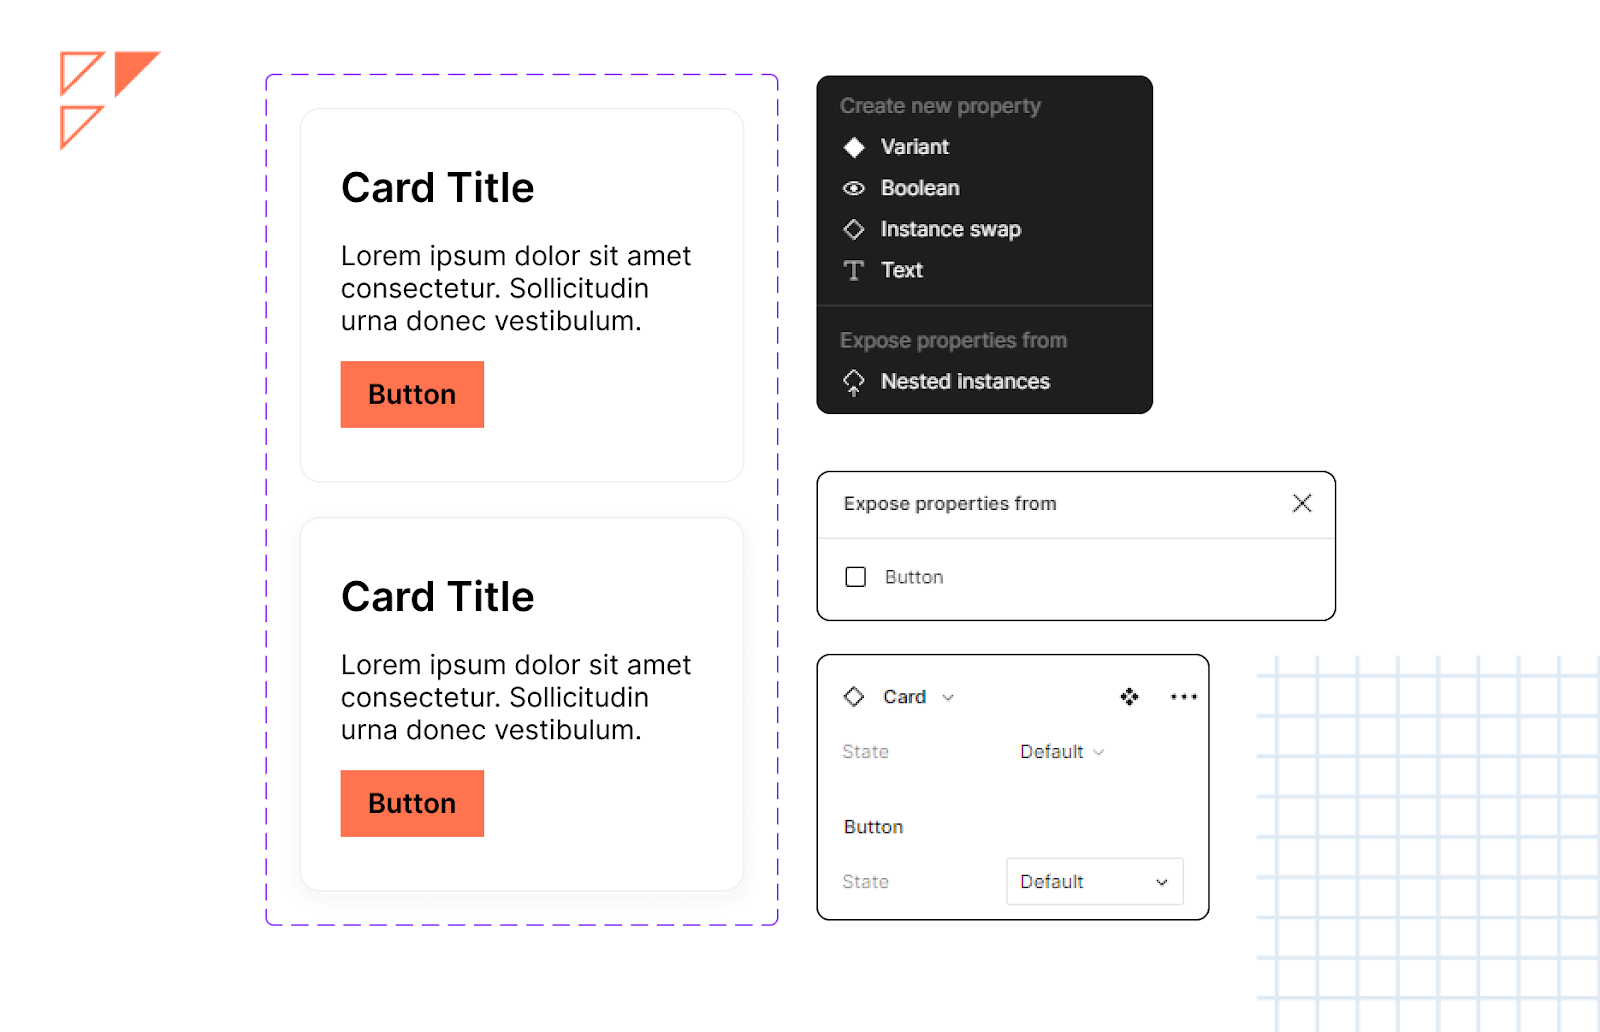
Designers can expose specific nested instances to reveal their component properties alongside those of the top-level instance. This allows for a more efficient workflow by reducing the number of clicks needed to make changes to a design. For example, imagine you have created a card component with multiple nested components; rather than having to deep-select into each layer to find their component property controls, you can now click on the top-level component and edit your instance from a single place.
Once you select a top-level instance with exposed nested instances, a list of component properties for the top-level and nested instances will appear in the right sidebar. When hovering over a property row, a light purple highlight appears around the corresponding object on the canvas so you know exactly what you're editing. Overall, this new feature will save designers time and streamline their workflow, resulting in a more efficient design process.
Check out our Figma Complete Guide to learn everything you need to know about Figma!